")


Mapping a network drive might sound daunting, but it’s straightforward on Windows. It’s a great way to automatically connect to your mapped folder at sign-in and keep the connection open in File Explorer.
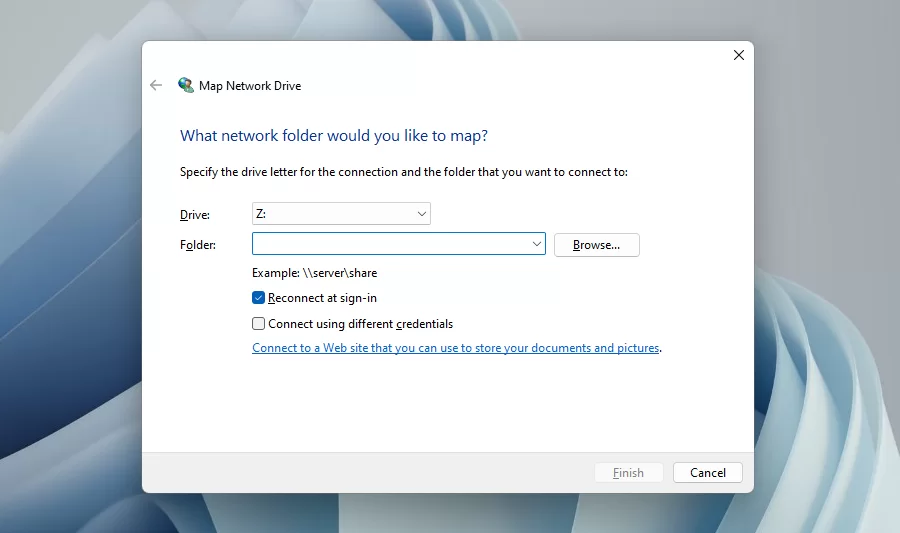
To map a drive, click the Computer ribbon and select Map network drive. Then, enter the UNC path for your shared folder.
How to Map a Network Drive
Mapping a network drive creates a convenient shortcut to a shared folder on another computer or network device. It allows you to access the folder like a local drive on your computer. Network drives are a great way to store and access data across the internet in a home or workplace setting. They are similar to shared folders but provide a faster connection to your files by acting as a local drive on your computer. You can easily access data located on a server by mapping a network drive to a specific folder. This is particularly useful when the data is not available on your computer.
A network drive can be accessed by using the file access protocol for the operating system, such as NFS (Network File System) for Windows, CIFS for Mac and Linux systems, or SMB (Server-Based Bidirectional File Sharing) for Microsoft Windows. Once a network drive is mapped, it will appear as a standard local drive on your computer and can be accessed by selecting the appropriate letter in the available list of drives in File Explorer.
To map a network drive on a Windows computer, open File Explorer and select This PC from the left pane. On the right side of the window, click on the Computer tab and then click Map network drive. Enter the path to the network share, which will look something like the server name shared folder, and click finish. You will then be prompted to enter your credentials. In this case, you must enter your Texas state net ID username and associated net ID password. You can check the “Remember credentials” box to avoid re-entering your credentials each time you connect to the network drive.
What is a Network Drive?
Network drives, also known as mapped drives and mount points, make centralized file storage much more accessible for workplace or home users. The main difference between a network drive and other storage devices like hard disk drives, SD cards, USB flash drives, and external drives is that network drives allow multiple computers to access them.
A network drive is usually located on a server, network-attached storage (NAS), a cloud-based service, or a local computer. Mapped drives are network drives assigned a drive letter in Windows or a mount point in macOS, making them look like they’re available on your computer as if they were a physical storage device.
When you access a mapped drive, the saved files appear as if they are stored locally on your computer, and you can use File Explorer to access them. Depending on configuring, a mapped network drive can be automatically connected whenever you log on to your computer or manually opened when needed.
While a network drive makes it easy to save files and have them accessible anytime, there are some limitations and disadvantages. For example, if your network goes down, all files saved on a network drive will be inaccessible. In addition, the fact that the same network drive is shared with many users increases the risk of accidental deletion, modification, or hacking of files.
How to Map a Folder on a Network Drive
If you have files often accessed from other computers or locations, mapping those folders to a drive letter on your computer makes it easier to access these items. This process is also called mounting shares, and it works on Windows, Mac, or Linux systems. When a network drive is mapped, the shared folder appears as a local drive path in file explorer or windows explorer.
You can map a network drive using file explorer or the command line. To map a shared folder, you need to know its UNC path. In the map network drive wizard, you can find the Folder box. It is formatted as hostname\sharename. Sharename refers to the name of the shared network folder, while hostname is the name or IP address of the network device. Once you’ve finished the mapping, please check the Reconnect at the sign-in box if you want Windows to connect automatically to the mapped network drive.
Mapping a network drive can save you valuable space on your local hard drive since you’re accessing data stored in another location. It can also make it easier to backup files since some online backup services support backing up a mapped drive.
How to Map a Drive in Windows
Network drives are a great way to access files stored on another computer or server over a network connection. However, there are a few things to remember when using a network drive.
First, make sure that the folder you are trying to map is available on your network. To access a folder, open File Explorer and select “This PC” under Quick Access, or right-click on the folder. Additionally, ensure your firewall and antivirus software are not blocking the connection. If you cannot access the folder, restart your computer and the network drive.
Once you have verified that the folder is accessible on your network, you can use the Map network drive option in file explorer or this PC to connect to it. The map network drive dialog box will ask for a drive letter and the path to the shared folder you want to connect to. It will also have two checkboxes, one for reconnection and another for alternate user authentication. Selecting the second checkbox will prompt you for a password when you connect to the drive, which is necessary if you connect to the UCONN network from off-campus computers that do not have an active connection to the active directory domain.